- Overview
- Update the PHP Version or Generate a New php.ini File
- Add PHP handlers
- CGI Type
- Standard PHP (Default)
- PHP Single php.ini
- PHP FastCGI
Overview
The version of PHP helps keep your site secure, running efficiently, and compatible with any plugins. This article explains how to generate a new php.ini file if you are into changing the PHP version or made an error with your current php.ini file. Upgrading your PHP will automatically create the new php.ini file.
Update the PHP Version or Generate a New php.ini File.
Important Note: PHP versions PHP 7.X are deprecated. We recommend that you update to a supported version of PHP.
Note: We have updated to PHP version 8.2 in June 2023. For more information on updating content for PHP compatibility, read our guide on What to do if your Site Does not Work with Newer Versions of PHP. To learn more about what is changing with PHP 8.3, please see PHP.net's release notes.
Account Manager
- Log in to your Account Manager.
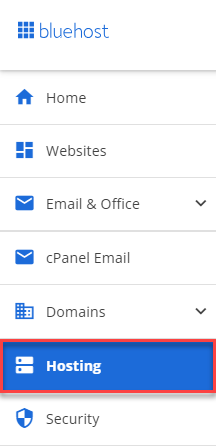
- Click the Hosting tab from the side navigation.

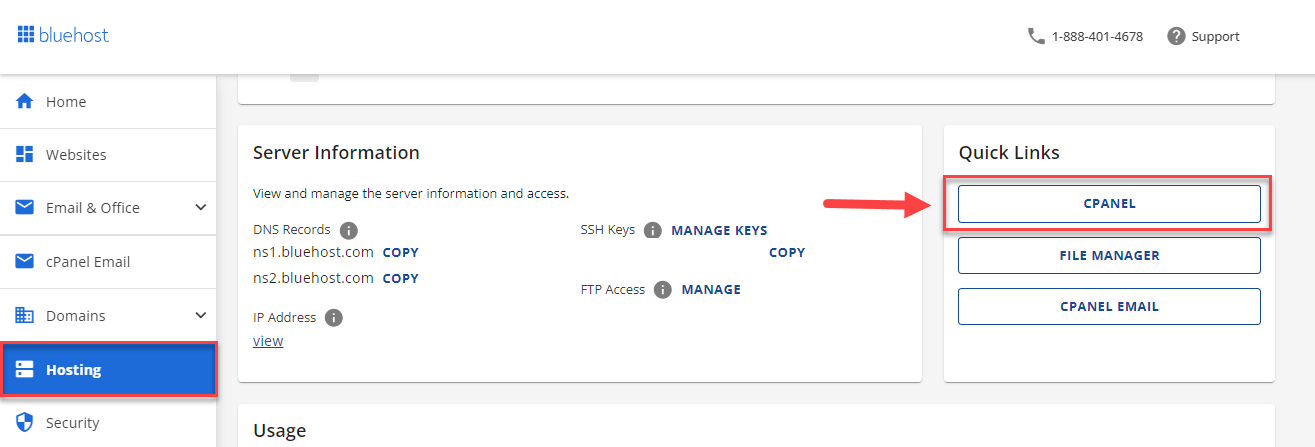
- Under Quick Links, click on cPanel.

- Under the Software category, select MultiPHP Manager.

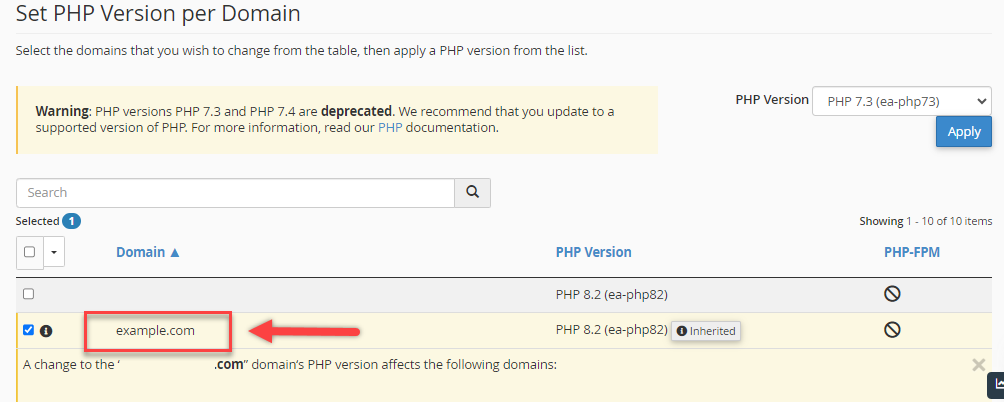
- Choose the domain you want to set up or update from the list.

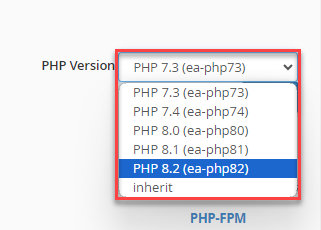
- Select the PHP Version you want to use at the top right-hand side.

- Click the Apply button to finish the update.

If you have any further questions about configuring the php.ini file, there are extensive descriptions within the file itself. You may also find more help at http://www.php.net/docs.php.
Add PHP handlers
You can customize the version of PHP that runs PHP files by directly editing the .htaccess file. Once the .htaccess file has been created or located:
- Right-click on the .htaccess file and select code edit.
- You may get a popup asking about encoding. If so, click the edit button.
- At the top of the file, insert the PHP handler for the version you would like to use. If there is a handler in the file already, it should be removed or replaced with the new handler.
- PHP 7.2
php – BEGIN cPanel-generated handler, do not edit
Set the “ea-php72” package as the default “PHP” programming language.
<IfModule mime_module>
AddHandler application/x-httpd-ea-php72___lsphp .php .php7 .phtml
</IfModule>
php – END cPanel-generated handler, do not edit
- PHP 7.3
php – BEGIN cPanel-generated handler, do not edit
Set the “ea-php73” package as the default “PHP” programming language.
<IfModule mime_module>
AddHandler application/x-httpd-ea-php73___lsphp .php .php7 .phtml
</IfModule>
php – END cPanel-generated handler, do not edit
- PHP 7.4
php – BEGIN cPanel-generated handler, do not edit
Set the “ea-php74” package as the default “PHP” programming language.
<IfModule mime_module>
AddHandler application/x-httpd-ea-php74___lsphp .php .php7 .phtml
</IfModule>
php – END cPanel-generated handler, do not edit
- PHP 8.0
php – BEGIN cPanel-generated handler, do not edit
Set the “ea-php80” package as the default “PHP” programming language.
<IfModule mime_module>
AddHandler application/x-httpd-ea-php80___lsphp .php .php8 .phtml
</IfModule>
php – END cPanel-generated handler, do not edit
- PHP 8.1
php – BEGIN cPanel-generated handler, do not edit
Set the “ea-php81” package as the default “PHP” programming language.
<IfModule mime_module>
AddHandler application/x-httpd-ea-php81___lsphp .php .php8 .phtml
</IfModule>
php – END cPanel-generated handler, do not edit
- PHP 8.2
php – BEGIN cPanel-generated handler, do not edit
Set the “ea-php82” package as the default “PHP” programming language.
<IfModule mime_module>
AddHandler application/x-httpd-ea-php82___lsphp .php .php8 .phtml
</IfModule>
php – END cPanel-generated handler, do not edit
- PHP 8.3
php – BEGIN cPanel-generated handler, do not edit
Set the “ea-php83” package as the default “PHP” programming language.
<IfModule mime_module>
AddHandler application/x-httpd-ea-php83___lsphp .php .php8 .phtml
</IfModule>
php – END cPanel-generated handler, do not edit
- Once you have added one of those codes, click Save. The account will then use the PHP version you selected.
CGI Type
Below are options to consider when selecting the PHP type.
Standard PHP (Default)
By default, all accounts use standard PHP. A PHP script will use the server's master php.ini configuration file with standard PHP selected if the script's directory does not contain a php.ini file. Each hosting account initially has a copy of the php.ini file in the public_html directory. You may make any changes to this file, and the modification will take precedence over the master file. With standard PHP selected in the cPanel, you will need to copy the modified php.ini file into all subdirectories containing PHP files to use the custom PHP settings.
Different folders can have different php.ini files containing different PHP settings. If you need to use different PHP settings for two different scripts, you can place them in their own folder and with their own php.ini file.
PHP Single php.ini
To avoid copying the same php.ini file to each and every directory containing PHP files, you may select PHP Single php.ini. This option changes the PHP handler defined in ~/public_html/.htaccess to indicate that all subfolders use the same php.ini found in public_html/.
The .htaccess PHP handler is recursive through all subdirectories unless a subdirectory has a .htaccess file defining a PHP handler.
PHP FastCGI
Using the PHP FastCGI option makes all your PHP applications run through mod_fcgid instead of mod_suphp. FastCGI uses only one php.ini file located in the public_html directory.
Pro Tip: For information about configuring PHP for an addon domain, please see PHP Configuration for Addon Domain.
If you need further assistance, feel free to contact us via Chat or Phone:
- Chat Support - While on our website, you should see a CHAT bubble in the bottom right-hand corner of the page. Click anywhere on the bubble to begin a chat session.
- Phone Support -
- US: 210-488-5907
- International: 210-488-5907
You may also refer to our Knowledge Base articles to help answer common questions and guide you through various setup, configuration, and troubleshooting steps.

