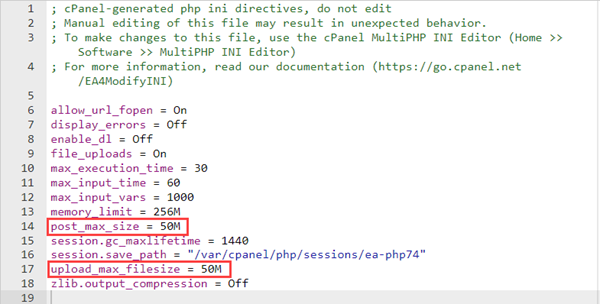
By default, PHP has a limit set to 50 MB (megabytes) for uploading through PHP scripts on our servers. If you need a higher limit, you can usually change that through the php.ini file. This article will walk you through increasing the upload limits through php.ini.
You will need to have your PHP set in the cPanel to one of the Single php.ini options to do this. Neither the default nor FastCGI settings will work. To learn how to change the PHP option your account is using, please see PHP Version Selection.
It will not affect the phpMyAdmin in the cPanel, as that uses a different php.ini that is only accessible to the server administrators. To get started, access your RCS account, and to determine if you're using Bluerock or Legacy, please check this article.
- Editing upload_max_filesize and post_max_size
- memory_limit
- max_execution_time and max_input_time
- Apache Settings
- Other Options
Editing upload_max_filesize and post_max_size
Bluerock
- Log in to your BRAND Account Manager.
- Once logged in, find and click the Hosting tab on the left side of your Account Manager dashboard.
-
Choose the Hosting Package name you want to manage under the All My Hosting Packages section.
-
If you have multiple Hosting packages on your account, click the MANAGE button on the Hosting package you want to manage.
-
If you only have a single Hosting package on your account, you will be rerouted to the Hosting Overview page.
-
- Click the FILE MANAGER button under the Quick Links section.
Tip: You can access the public_html folder if you are working on the primary domain of your account or access the root - a folder with the name of the specific addon domain you'd like to work on. These folders usually house your php.ini file.
- Scroll down in the right-hand panel to the file php.ini, and right-click it.
- In the pop-up menu, select Edit.
- Use the keyboard shortcut to open the find pop-up window.
Windows and Linux: Ctrl + f
Mac: Command (⌘) + f - In the Search text field, type upload_max_filesize and press enter.
- This will highlight upload_max_filesize = 50M. Change 50M to the size you need.
- Open the find pop-up again. In the Search text field, type post_max_size and press enter.
- Highlighted will be post_max_size = 50M. It will need to be changed to the same number as what was entered for upload_max_filesize.

- Click Save changes.
Note: If there's no php.ini on your File Manager, you can also generate and edit these PHP values and limits via MultiPHP INI Editor.
memory_limit
When the PHP engine is handling an incoming POST, it needs to keep some of the incoming data in memory. This directive only affects if you have used the --enable-memory-limit option during configuration. Setting too high a value can be very dangerous, as several uploads being handled concurrently can lead to memory limits maxing out and server performance issues.
max_execution_time and max_input_time
These settings define the script's maximum lifetime, and the time the script should spend in accepting input. If several megabytes of data are being transferred, max_input_time should be reasonably high.
You can override the setting in the .ini file for max_input_time by calling the set_time_limit() function in your scripts.
Apache Settings
The apache web server has a LimitRequestBody configuration directive that restricts all POST data sizes, regardless of the web scripting language in use. Some RPM installations set the limit request body to 512Kb. You will need to change this to a larger value or remove the entry altogether.
Other Options
If you expect to handle a large number of concurrent file transfers on your website, consider using a PERL or Java server-side component. PHP happens to be our favorite web programming language, but PERL can offer a slight advantage when file handling.
Most installations of PERL as an apache module can accept up to 32 megabytes out of the box. Compare this against the 2MB default for PHP. The downside is that PERL coding takes just a bit more effort than PHP, but it's worth it.
If you need further assistance, feel free to contact us via Chat or Phone:
- Chat Support - While on our website, you should see a CHAT bubble in the bottom right-hand corner of the page. Click anywhere on the bubble to begin a chat session.
- Phone Support -
- US: 210-488-5907
- International: 210-488-5907
You may also refer to our Knowledge Base articles to help answer common questions and guide you through various setup, configuration, and troubleshooting steps.

